The next stage in the garden makeover was to do something about the hideous lower lawn that had been reworked by a certain puppy!!!! The patches of bare earth were to much to tolerate so we devised a new plan. We decided to get rid of the lawn completely and put in two raised beds and then spread bark chippings in between.
 |
| Doesn't look the best does it? |
I started off by scraping just the top very thin layer off to get rid of the grass. This was then put into the raised beds face down, with loads of soil and compost on top. I have done this before and the grass just becomes compost under all that soil.
 |
Just digging the top soil over a little.
|
I dug down a few inches as the soil was very compacted and was very pleased to see that there are lots of lovely worms working away in the soil. The soil is really nice and broke up easily and looks like it should yield some lovely crops.
 |
| Me and my little helper! |
The beds were constructed using 6" x 1" (150mm x 25mm) gravel boards. I used off cuts from the pergola and the little bits that were left over after cutting the boards to help construct it. I used just two 3m boards for each one. This gave me a raised bed of 2.1m x 70cm, which I think is a good size for the crops that we want to grow.
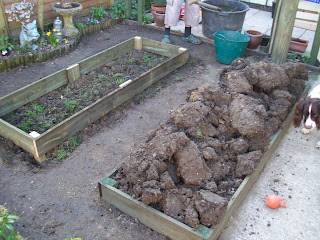 |
| Making progress. |
Although it doesn't look like it this, I was almost finished. You can just see that i have laid some of the old grass down in the second bed. The big pile of what looks like boulders is actually the soil dug to make the second bed. This was put into the bed gradually and broken up to make lovely fine soil. I added a full 70 litre bag of garden compost to the soil as well as 150grams of calcified seaweed which is a completely organic feed.
 |
Now doesn't that look better??
|
As you can see the beds look fantastic with the bark chippings around them. We shall start planting in the beds very soon. We have bought some little poly tunnels to protect the new growth and help them stay warm.
You will see the new little water feature i have added in the lower corner of that last picture. I will tell you how that was created in my next post.
To end this post i though i would put up a nice pic of one of the latest purchases and a new favourite of mine...
 |
| Fritillaria Meleagris 'Snakeshead Fritillary' |


Garden is looking great.
ReplyDeletei love our garden :)
ReplyDelete