Sunday 5 June 2011

Hands On!! ( or Off)

Now i do love to feel the soil between my fingers, it really gives me that connection to the earth, but sometimes you just have to let mother nature take her own course. I have left my garden to its own devices over the past few weeks while I have been partaking in another passion of mine, my campervan. I have been building some more furniture for the interior so the garden has taken a bit of a back seat.

Not that I have totally neglected it, I have been watering a lot due to the very warm and dry weather we have been having for a long time.Today is the first real rain we have had since back in march sometime. Last week I followed a tip given to me by my sister and just laid the hose in the flower beds and left it running slowly to try and build up the water table.

So today's blog entry is to show you how things have changed in the garden since last time... so I am just going to add some pictures.
Taken this morning.
I love my Columbines. I have no idea what avriety this is but the flowers are huge!!
Poppy 'Royal Wedding'
My work on the campervan is almost finished so I will be back to some gardening soon. I wan to concentrate on the front and side gardens for a while as they are not looking as good as I want them too.

Monday 25 April 2011

99 in the shade

The weather here has been absolutely amazing and just recently it has really gotten way to hot for this time of year. The temperature has regularly hit well over 100f in the past few days, and a couple have hit an amazing 115f!!!
almost of the scale!!
i said last time that i would show you how i made the water feature and here is how. It's quite simply built using gravel boards, the same as used in the raised beds. I cut the boards into small sections with a 67.5 degree angle at each end. This gives you a nice octagonal surround to the tub that will sit inside. I originally made it three sections high, but it soo became apparent that that was too tall.


Is there anyone in there??!!

I had to cut the sides of the tub down to fit the surround, but again this was very easy to do.

The pump we had was okay but much too powerful for the tub and didnt really look right. We purchased another one from good old e-bay for a bargain of £25 including postage for a brand new one. It came with different attachments to give different fountains. We also started with a mesh over the top of the tub but inset into the surround, and then covered with pebbles. This has changed now to having the tub half filled with stones which actually saves on the amount of water needed in the tub.

The water feature looks amazing, especially as the plants around it have grown up so much. We have also added a couple of marginal plants into the water feature too. These are Geum rivale and Carex muskingumensis and they sit in basket pots just below the surface of the water.
 
The feature really blends in now, surrounded by columbines, yellow loose strife, Delphinium, wallflowers and lobelia, to name but a few.


The whole garden has transformed recently, with so much growth and of course a lot of new plants have been added. We have planted out potatoes into two potato growing bags, an early crop 'foremost' and a main crop of 'desiree'. Three hanging baskets have been partially planted, one has strawberrys planted and the others are purely floral.


I took the last two pictures this morning at 9 am. Everything looks so lush and green, with spatterings of colour. The mexican orange blossom is in full bloom as is the banksia rose on the back wall. Unfortunately we lost the honeysuckle that was next to the rose on the bank wall. yet again the mildew set in and this time it was all over the plant. After some research it turns out it was due to bad positioning. The banksia rose has bloomed for the first time in two years
Just one more picture to end this posting I think. My tulips have bloomed and are looking stunning. It's such a shame that i didn't plant more!

Monday 4 April 2011

And now for something completely different......

The next stage in the garden makeover was to do something about the hideous lower lawn that had been reworked by a certain puppy!!!! The patches of bare earth were to much to tolerate so we devised a new plan. We decided to get rid of the lawn completely and put in two raised beds and then spread bark chippings in between.

Doesn't look the best does it?

I started off by scraping just the top very thin layer off to get rid of the grass. This was then put into the raised beds face down, with loads of soil and compost on top. I have done this before and the grass just becomes compost under all that soil.

Just digging the top soil over a little.

I dug down a few inches as the soil was very compacted and was very pleased to see that there are lots of lovely worms working away in the soil. The soil is really nice and broke up easily and looks like it should yield some lovely crops.

Me and my little helper!
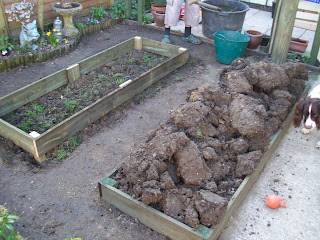
The beds were constructed using 6" x 1" (150mm x 25mm) gravel boards. I used off cuts from the pergola and the little bits that were left over after cutting the boards to help construct it. I used just two 3m boards for each one. This gave me a raised bed of 2.1m x 70cm, which I think is a good size for the crops that we want to grow.

Making progress.
Although it doesn't look like it this, I was almost finished. You can just see that i have laid some of the old grass down in the second bed. The big pile of what looks like boulders is actually the soil dug to make the second bed. This was put into the bed gradually and broken up to make lovely fine soil. I added a full 70 litre bag of garden compost to the soil as well as 150grams of calcified seaweed which is a completely organic feed.

Now doesn't that look better??
As you can see the beds look fantastic with the bark chippings around them. We shall start planting in the beds very soon. We have bought some little poly tunnels to protect the new growth and help them stay warm.

You will see the new little water feature i have added in the lower corner of that last picture. I will tell you how that was created in my next post.

To end this post i though i would put up a nice pic of one of the latest purchases and a new favourite of mine...
Fritillaria Meleagris 'Snakeshead Fritillary'

Sunday 27 March 2011

Shoot(s) To Thrill...

It's been a very busy time in the garden just lately, with a lot of changes happening.

First off I thought i would share a couple of pics of my lovely little seedlings...

The little greenhouse


The seeds from the window ledge enjoying the sun
The temperature her has been amazing for this time of year, hitting the 80's and even into the 90's a couple of times. Not usual weather for spring. The good thing is I have been able to spend a lot of time getting things done that have been planned for some time. One of these was to build a pergola over the patio at the back of the house. I didn't have much room but I think I managed to get it to look pretty good.

Laying out the wood to see how it will look.

All built and looking pretty good
You will see that the two posts near the fence are closer together. That is something kind of done on purpose and kind of by accident. I bought 3m long beams for the top and they didnt quite reach the fence, but i didnt really want it to go too close to the fence anyway. It means we can now put something nice between to grow up nice and tall, we have Morning Glory growing from seed for this purpose which will be trained around the two far posts.

The pergola was finished off with Cuprinol wood preserver in woodland green and then we wound the jasmine and the climbing rose around the beams they would reach. They both look like they have been there for sometime, but will look even better by the summer as they both grow so well. Here's the finished shot...
Not bad, even if I do say so myself!
The bottoms of the posts were made into a couple of small beds as you can see. On the right of the picture, the bed has been planted with Potentilla x tonguei, Aquilegia vulgaris 'Black Barlow' and Oriental Poppy 'Royal Wedding'. The left bed has been planted with Polemonium caeruleum alba and Pratia pedunculata. We moved our Geranium x oxonianum 'Wargrave Pink'  over a little to sit against the farthest post on the left.

Monday 21 February 2011

A little bit more

Goldfinches at the feeder


I really must get a better camera! The one I have doesn't like to zoom in and picture quality goes.
Here is another picture, my little helper...

Plant pots are fair game!!


You can see in this picture how bad the lawn is. Getting a puppy is never good for lawns!!! Flynt has nuclear wee I think as it completely killed of large sections of my lovely green pasture. We are going to change the bottom section (seen here) into a vegetable area with two long raised beds and bark chippings forming paths between them.

A bit of a change around

Today I have decided to give this blog a change around as I want to keep this front page for current news and stuff. You will find I have changed the page at the top to 'Garden History', this will be just to show how we have transformed the garden into where it is until this years' change around.

I'm not feeling to good today , and my back is hurting too much to do anything more than sit and do some to my blogs and then onto to doing some more to one of my model trucks

Saturday was good, as we went to the market in Lymington and bought some new plants back.

The new plants awaiting planting
Th e purchase was for two Birch hedging trees, a climbing Hydrangea of unknown type, a Phlox(Subulata Emerald Cushion), Aquilegia Vulgaris (Black Barlow) and two pots of Crocus (cream beauty), all for the cracking price of just £9!!!

A close up of those wonderful Crocus flowers. These all have double stems coming from each bulb. I thought two pounds for these wasa bit of a bargain. I have planted on pot out on the 'Cody Bed' so that they mingle with the deep purple ones already there.

I also did some seed planting too. I may have done these a week or so too early but it is very mild here so I thought it would be okay. If it does get a bit colder then i have plenty of space on the window ledges for them. The seeds I have sown are Ipomoea (Morning Glory - Inkspots), Consolida Ambigua (Larkspur) and Matthiola Longipetala which sounds a bit made up to me!! those are Night Scented Stock, Starlight Sensation.

Sunday 13 February 2011

My First Post!!

I have been thinking of starting a blog for some time, but never got round to it as they say, so here is the start of what I hope will be a fun blog for people to read. The blog will primarily be about my garden, it's history and how it has been transformed into something that will be enjoyed for many years to come.

There will be other pages which will be about other interests I have such as Model Making and the conversion of a common van into a lovely little home on wheels.

There will be bits about me too and about my home in the New Forest as well as surrounding areas.

I hope you will enjoy reading this as much as I will enjoy sharing my thoughts and experiances with you.